Hollow Pin Chain Selection Guide
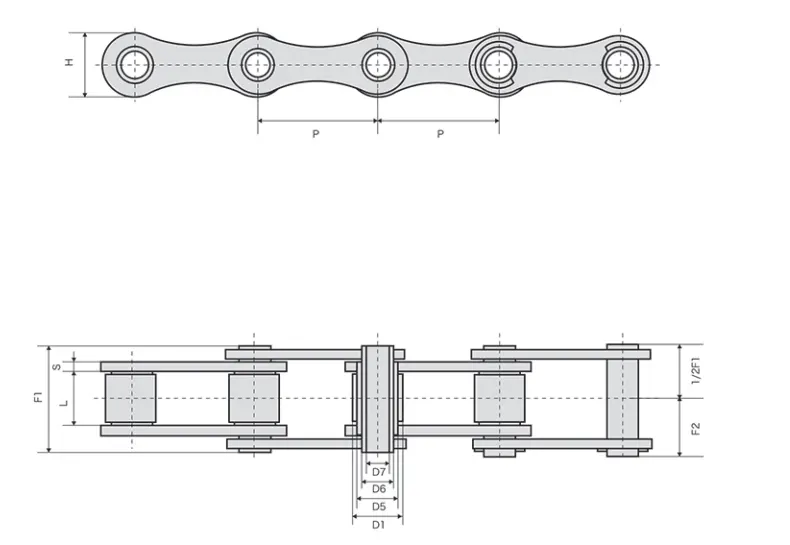
Choose hollow pin chain by pitch, bore, width, roller arrangement, load, sprocket fit and operating environment.
1. Start with pitch
Pitch is the distance between adjacent chain joints and must match the sprocket. For new equipment, pitch also determines the spacing available for repeated carriers or fixtures. For replacement work, measure several pitches and divide by the number of pitch intervals to reduce the effect of joint wear.
2. Check the hollow bore
The bore determines the nominal space available for an inserted rod, bolt, spacer or attachment element. Allow room for assembly and service, and consider how the inserted part will be retained. If one rod spans two parallel strands, include its diameter, span and load position.
3. Match width and roller arrangement
Inner width, plate envelope, roller or bush diameter and pin projection must fit the existing sprocket, rails and side frames. The same pitch can appear in different chain families, so use the whole set of dimensions rather than pitch alone.
4. Define load and duty
Provide conveyor pull or product load, speed, starts/stops, indexing, shock or jam conditions, operating hours and number of strands. Tensile or breaking values are useful product properties, but the working conveyor load depends on the complete machine duty and design margin.
5. Define the environment
Dry indoor automation, dusty handling equipment, humid plants and washdown lines may require different materials, surface treatments and lubrication. State temperature, water, cleaning chemicals, abrasive contamination and any lubricant restrictions.
6. Confirm sprockets and guides
New chain will not correct a badly worn sprocket or misaligned guide. Check tooth condition, shaft parallelism, sprocket alignment, rail wear and take-up before installation. On twin-strand conveyors, keep the strands matched and the carriers square.
Quick RFQ checklist
- Chain model or measured pitch
- Hollow bore, inner width and roller/bush diameter
- Total length or pitch count
- Attachment or cross-rod drawing
- Sprocket tooth count and key dimensions
- Speed, load, starts/stops and operating hours
- Temperature, moisture, cleaning and lubrication
- Material requirement and quantity
Send your chain details for review
Include the model or dimensions, attachment drawing, sprocket information, speed, load, environment and quantity for a quotation.
Step 1 — establish the mechanical envelope
Record the available chain width, sprocket diameter, guide position and the space required for rods or carriers. Pitch determines the repeating joint distance and strongly influences sprocket size. Hollow bore determines what can pass through the pin, while inner width, roller or bush diameter and side-plate height determine how the chain fits the sprocket and guide.
Step 2 — describe the load in useful terms
Do not send only motor power or product weight. Describe total moving load, number of strands, conveyor inclination, speed, starts and stops, indexing cycle and any impact or jam condition. If two strands support one carrier, include chain-centre distance and carrier mass. If the attachment is offset from the pin centreline, show the offset because it can create a moment on the hollow pin.
| Selection input | What to record | What it affects |
|---|---|---|
| Pitch | Centre distance between adjacent joints | Sprocket geometry and attachment interval |
| Hollow bore | Minimum clear bore through the pin | Rod, bolt or fixture fit |
| Inner width | Clear width between inner plates | Sprocket fit and chain envelope |
| Roller/bush | Diameter and arrangement | Guide contact and sprocket engagement |
| Pin projection | Overall outside width | Machine clearance and attachment access |
Step 3 — match the attachment concept
For a single rod through one hollow pin, specify rod diameter, material and retention. For a rod across two chains, add strand spacing, unsupported span and load. For a pallet or fixture, provide mass, centre of gravity and mounting position. If attachments are removed during changeover or cleaning, show the service access and desired removal method.
Step 4 — check sprocket and guide compatibility
A chain with the same pitch is not automatically interchangeable. Compare roller or bush diameter, inner width and plate envelope with the sprocket tooth form. Check guide rail width and height against the chain. For a replacement project, inspect the sprocket for hooking or uneven wear before fitting a new chain.
Step 5 — choose material for the actual environment
Dry packaging, dusty handling and wet food service place different demands on the chain. State temperature, moisture, cleaning chemicals, dust or product residue and lubrication restrictions. Stainless construction can be considered for wet or corrosive zones, while standard steel may be suitable for dry service with normal lubrication. The surrounding hardware should be considered at the same time.
Step 6 — define what will be purchased
Finish the RFQ with chain model, finished length or pitch count, connection type, quantity, matched-strand requirement, attachment hardware and delivery destination. If a custom drawing controls the order, include its revision. For repeat OEM machines, state annual usage so the same configuration can be quoted consistently.
Selection mistakes to avoid
- Selecting only by pitch
- Using one worn link as the nominal measurement
- Ignoring rod bending across a wide conveyor
- Reusing damaged sprockets with new chain
- Assuming stainless removes lubrication needs
- Omitting units from replacement measurements
- Forgetting matched strands for a rigid carrier
- Ordering before attachment clearance is checked
Final drawing review before release
Before approving a chain for production, check the proposed dimensions against the actual machine drawing rather than only a catalogue table. Confirm sprocket centre distance, guide clearances, attachment access and the finished chain length. If the chain is a replacement, record any deliberate deviation from the original component so maintenance teams understand the change later.